|
|

Engineering, electronics and most modern design disciplines are driven by the need to be constantly better than what went before. Acoustic musical instruments on the other hand don't seem to have much evolutionary force driving their development. Most musicians want to play copies of the instruments that their heroes in the past played, which were usually designed for cheap factory production.
Greg Smallman, Peter Biffin and Steve Klein are 3 makers who inspired me in the 70s to think that there is a lot more to guitar design than what the modern steel string had to offer. Since then I have gone in many directions. Some were dead ends and some were not, but all of them have given me some insight into the endless complexities of acoustic instrument design.
I have tried to express below some ideas that have become foundational to my work. These are simplified explanations of something that is extremely complex, but hopefully they will help explain where and why I have diverged from the standard models of guitar design.
There are a few other makers who have arrived at a similar place via different ideas, and their explanation of what they do and why might be very different. Here is a link to an excellent description of soundboard design in classical guitars by Bert Eendebak.
I define the soundboard not as the top of the guitar, but as a specific area of top around the bridge that has the function of converting the bridge energy into sound. (think of a speaker cone) In most classical guitars this area finishes at the brace below the soundhole, whereas in most steel string guitars it continues up to the big brace where the fingerboard ends. The size of the sound board and how it functions is determined by the braces. In my guitars the three functions of the braces are to strengthen the guitar, to transfer vibration from the bridge to the active part of the soundboard, and to isolate the active soundboard from the rest of top.
The strings exert some force laterally as they vibrate. This is a fairly minimal force as it only has the weight of the strings to drive it. There are designs that use just this lateral force. John Millers mandola is an extreme and interesting example.
A more powerful force is in the tension of the string along it's length. As the string distorts the length changes. This tension force is moving at right angles to the direction you want the soundboard to move. A guitar with a tailpiece like a mandolin easily converts the energy by pushing the bridge straight down as the string shortens, but a fixed bridge instrument has a more complicated action.
Active modes in fixed bridge instruments
There are two modes describing the way that the string energy is passed on to the soundboard on a fixed bridge instrument. I call them active modes to differentiate them from Chladni patterns which I think of as passive modes, as they describe sympathetic resonance rather than mechanical activation. All guitars use both active modes to varying degrees.
Rocking or Twisting mode
As stated above, the energy of the strings is moving at right angles to the direction you want the top to move, so when a string is plucked the easiest action for the bridge on a fixed bridge instrument is to twist the top. I call this the rocking mode and it is responsible for most of the treble in steel string and classical designs. The ukulele uses it to great effect converting very low string tension into fairly high volume. It's good point is that it is an efficient way to produce sound. It's bad point is that it involves pushing one side of the bridge up and the other side down at the same time which cancels out some of the air pressure that produces audible sound. This effect is called phase cancellation, and it results in the loss of volume in some frequencies. Changing the amount of tension at the front and back of the bridge helps to reduce sound loss because the two areas want to move at different speeds. That is why classical guitars have a fan structure with a tighter area above the bridge.
Pumping or Full Phase mode
The other thing that the strings do as they pull on the bridge is to shift the whole top causing it to rise and fall. The sound produced by this is quite different to the rocking mode. Firstly it takes longer for the sound to activate, so it has a slower attack. Another property is that it is capable of producing the whole sound spectrum of the moving string because it doesn't lose frequencies due to phase cancellation. A third property is that it has more dynamic potential than the rocking mode. (more variation in volume) It also takes more energy to move the whole soundboard than it does just to rock the bridge which is why most of the sound you hear from a standard steel string guitar comes from the first mode.

The top above is fairly typical of steel string X bracing. It allows the bridge to rock providing treble, as there are no braces under the bridge. It also harnesses some full phase movement via the large X brace to produce lower frequencies. As you can imagine it requires a fair amount of power to activate the X brace.
This bracing design is wonderful at what it does, but it's properties are best suited to strumming where the characteristic lack of midrange could even be considered an asset. Trying to convert more rocking energy into full phase sound with this system would result in loss of volume, as the materials are inefficient and fairly heavy. A carbon lattice design on the other hand is well equipped to deal with it, as you can apply as much stiffness as you require with minimum weight.
A full phase guitar design
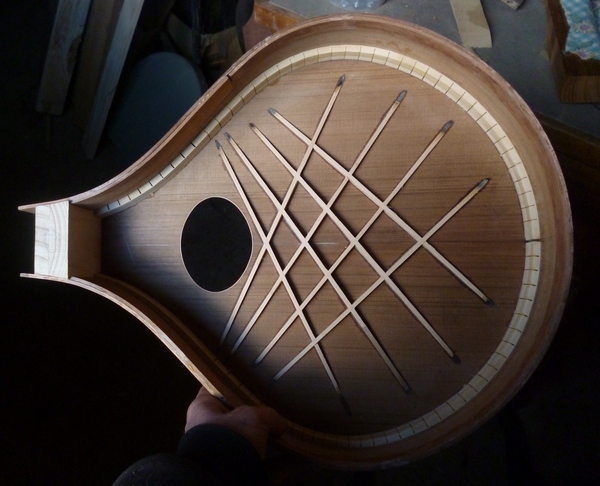
Below is a picture of one of my prototypes. My guitars are constantly evolving but the basic concept is the same. The current version is more like the cittern design below.
The area under the bridge is made rigid, so that the bridge does not rock, but the energy is sent through the interlocking carbon brace structure which acts as a single unit. This pumps the whole top up and down much like a tailpiece guitar. The hard carbon structure produces the treble and creates sustain right up the neck. The bass is produced by the loose soundboard edge which allows the whole top to move up and down like a speaker cone. The midrange is fully present because there is no phase cancellation causing it to drop out.
Here is a series of shots showing my construction method.

A guitar that uses mostly full phase energy is very different to a standard guitar and could almost be thought of as a different instrument. After playing this type of guitar for a while, I find that a standard steel string sounds two dimensional. One reason I am now focusing on making cittern guitars is that it is easier to see it as a different instrument. With a broad full phase sound from a small body, there is no reason not to remove the "shoulders" and have full fingerboard access. It simply means getting used to using a strap as a permanent fitting.
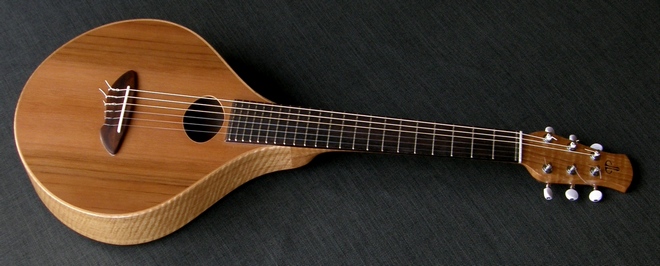
a small carbon string cittern guitar
I make every part of the body, except for the moving sound board, as solid as possible to reduce any phase cancellation. I use the thickest wood I can bend (about 3mm) and I make the back braces full depth for the whole width and join them to the sides. The heavy wood around the soundboard acts as a tone ring does on a banjo. It isolates the the vibration in the sound board and helps to project the sound out of the instrument. The heavy side braces lock the back into the tone ring also increasing the projection. Designing the body to not vibrate is a principal of speaker box construction. Graham Caldersmith gives a good explanation of this.
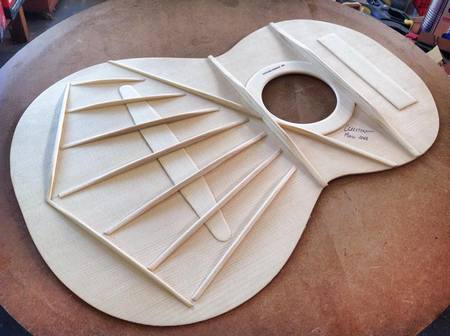
While many makers now use lattice designs in their bracing, it is using carbon fiber above and below the braces that multiplies the overall strength of the lattice. The fibers lock the braces together in such a way that the energy moves freely between them. Below is my fan lattice design before fitting the top layer of carbon. I am using this bracing on my classical cittern guitars.
Jim Redgate's guitars (above) use the fine lattice that is suggestive of Greg Smallman's classical guitars. There are special properties in a lattice design. If you make up a reinforced lattice, (either free floating or on a sound board) you will find that it can only twist in a couple of ways. Every other form of flexing is prohibited by the lattice structure. The most common types of out of phase sound board movement (top to bottom and side to side) simply cannot occur. Jim gives a good explanation. Adding this 'phase control' to the incredible strength to weight ratio of a carbon reinforced soundboard, you can begin to see the potential of carbon lattice guitars.
I have been posting some construction process pictures on my face book page.
I will continue to add information to this page and will try to answer questions. I would also love to hear from other makers who want to discuss ideas.

|
|